Thursday, January 28, 2010

Hurray for Hummus!

As promised….the recipe for the hummus I made on Sunday. Sunday also being the day that the COLTS earned their way to the Super Bowl!!!!! I can hardly wait!

The hummus was very easy to put together and had a wonderful flavor. I didn’t have any tahini paste but my mom did so I added that at the last minute. It gave it a very “hummus-y” flavor. I liked this hummus because it was a little sweeter than you would expect making it the perfect snack!

We snacked on this during the first half of the game and noticed the flavors became even better after they married together for awhile. I would suggest making it in advance and letting it sit for just about an hour before serving it. You won’t be sorry!

I also toasted up some pita crisps which served the hummus perfectly!

Spiced Sweet Roasted Red Bell Pepper Hummus
adapted from allrecipes.com

1 can garbanzo beans (15 oz) drained
6 oz roasted red bell peppers
3 Tablespoons lemon juice
1 Tablespoon Tahini paste
1 clove minced garlic
½ Teaspoon ground cumin
½ Teaspoon cayenne pepper
Salt & Pepper to taste
Parsley

1. Preheat oven to 400. In an electric blender or food processor, puree the garbanzo beans, red peppers, lemon juice, tahini, garlic, cumin, cayenne, and salt. Process, using long pulses, until the mixture is fairly smooth, and slightly fluffy. Make sure to scrape the mixture off the sides of the food processor or blender in between pulses. Transfer to a serving bowl and refrigerate for at least 1 hour. (The hummus can be made up to 3 days ahead and refrigerated. Return to room temperature before serving.)
2. Sprinkle the hummus with the parsley before serving.
3. Cut pita bread into triangles and lightly oil. Bake in oven until golden brown and crisp.


Here I am in my Colts gear before the BIG GAME!


The yummy finished product!


Last Bite: This is a very good and very easy dish to make. It will be a hit not matter where you take it!

Tuesday, January 26, 2010

Aruba Pizza


Well, ok so this pizza isn’t a cultural food experience like eating pasta in Italy or coq au vin in France. It mostly likely bares no reflection on the Aruban food experience other than it was the best dang pizza Pat and I possibly ever had.

We went to Aruba for our honeymoon this past September and it was fantastic. Water so blue and clear….palm trees….white sandy beaches….warm, warm sun…..you get the point. Basically the exact opposite of January in Indiana.

Anyways, we had just gotten done with a Sunset Sail one night and decided to go low-key and stop by a pizza joint, Tomato Charlie’s, on the island on the way back to our hotel. We ate outside under white twinkle lights with the warm breeze of the evening grazing our skin. (It is hard for me to imagine exposing any skin again as I sit here in my sweatshirt, yoga pants, wool socks and a blanket, but yes, in Aruba, you were always warm, even in a sundress).


The ingredients on the pizza are nothing crazy or unheard of for pizza. But there was just something about it. I have been dreaming about it ever since and decided to try my hand at recreating it this past weekend. We have made pizza’s at home before, but until that night I had never in my life made my own crust. It was such an exciting sense of accomplishment mixing the flour, yeast and oil together, forming it into a ball, kneading it and then (magically!) watching it rise.

Pat and I patiently waited for the pizza to cook in the oven while its sweet smell filled the air. Once it was bubbly and the crust was a beautiful golden brown we immediately gobbled it up. It was perfect! And for a second, we were in Aruba.


Really Simple Pizza Crust
From Smitten Kitchen

Makes enough for one small, thin crust pizza. Double if you like your pizza thick and bready.
(I doubled our recipe)

1 ½ cups flour
1 teaspoon salt
¾ teaspoon active dry yeast
½ cup lukewarm water (plus 2 tablespoons)
1 tablespoon olive oil

Stir dry ingredients, including yeast, in a large bowl. Add water and olive oil, stirring mixture into as close to a ball as you can. Dump all clumps and floury bits onto a lightly floured surface and knead everything into a homogeneous ball.

If you are finding this step difficult, one of the best tricks is to simply pause. Leave the dough in a lightly floured spot, put the empty bowl upside-down on top of it and come back in 2-5 minutes. The dough will be a lot more lovable then.

Knead it for just a minute or two. Lightly oil the bowl (you can use the same one) or spray with cooking spray and dump the dough in. Turn the dough so that every side is covered. Cover it with plastic wrap and set it someplace warm with no drafts for an hour or two, until it has doubled in size. Setting it on top of an oven on low does wonders!

Dump it back on the floured counter and gently press the air out of the dough with the palm of your hands. Fold the piece into an approximate ball shape, and let it sit under the plastic wrap for another 20 minutes.

Sprinkle a pizza stone or baking sheet with cornmeal and preheat your oven to it’s top temperature. Roll out the pizza and toss on your toppings.

For the Toppings:
1 green bell pepper cut into thin slices
½ red onion (or more if you really love it) cut into thin slices
1 15 oz can of Dei Fratelli Pizza Sauce
8-12 oz of fresh mozzarella cheese (depending on how much you want) sliced
1 cup of mushrooms
8-10 pepperoni slices (again, depending on how much you want)

Cook bell pepper and onions on a grill pan on medium high heat for about 8-10 minutes, or until tender. Add the mushroom until slightly cooked.

To make the pizza first apply the pizza sauce. I didn’t use the whole 15 oz can, just enough to really coat the dough . (I couldn’t find any smaller sizes at my store). Then place the mozzarella cheese on top. We like to coat just about every inch!

Next add the rest of your toppings, pepperoni, peppers, mushroom and onions, then toss 'er in the oven.

Bake for 10-15 minutes until the crust is golden brown.

I like to add red pepper flakes to my pizza before eating it…but that’s just me!

Here is the start of my yummy dough.


Stirring the ingredients together.


And forming into a ball!


I really liked the Dei Fratelli pizza sauce. It has a nice fresh taste that didn't overpower.


Do you like how we cut tiny slivers of cheese so as not to leave any space uncovered!


Our pizza right before we put it in the oven.


And now finished in all it's delicious glory!


Oops...it's missing a bite!


Two very happy and full people!


Last Bite: Making a pizza crust from scratch is not the scary at all! It is actually pretty easy and fun. Choose any toppings you like and go for it! You won't be sorry!

Sunday, January 24, 2010

Let's Go, Let's Go, L-E-T-S G-O!

GO COLTS!!!!!!

I'm heading to my parents this afternoon to cheer on the best team ever...the COLTS! I'll be making a Spiced Sweet Roasted Red Bell Pepper Hummus with pita chips....can't wait to let you know how it turns out!


Thursday, January 21, 2010

Get in my belly!

Oh seafood, how I love you! And when I mix you with cream, wine, butter, leeks, carrots and bake you in the oven…where have you been all my life? This Seafood Gratin by Ina Garten won big in the Knox household. Healthy? Hmmm….well yes, before you add the cream and butter. But that extra mile you have to run the next day will be totally worth it (or in my case…just the time you spend thinking how you should be working out) I Promise!!

I decided to make this last Sunday afternoon. Pat was back in the office on the computer probably either looking at new phone or a new TV....his favorite pastime. And I had finished folding clothes and just couldn’t quite figure out what sounded good for dinner so I browsed through a few cookbooks until I came across this dish. I had looked at it before and decided that was the night to try it out!

I was pretty certain that I had all the ingredients to make this delightful looking dish and so away I went, chopping and defrosting. So what if I misread Seafood Stock to say Chicken Stock! Who cares that I didn’t actually have any lobster meat laying around the house (don’t we all?!?) but instead just used shrimp and canned crab meat! It was still superb! And I promise you’ll love it!

Confession time: It is shameful, I admit, but generally when a recipe calls for shrimp…well I just buy a bag of the precooked frozen shrimp. Lazy? Yes! But when I work until 5 and don’t get home until 5:30, and am normally starving…well that precooked shrimp is just fiiiiine.

However that may soon come to an end as the last time I was at the store I bought a bag of the peeled and deveined UN-cooked shrimp which I used for this recipe. And now I know the wonderful difference!

My sauce didn’t come out as thick as it should, but I think it was due to my impatience of stirring constantly for 5 minutes. But hey-stir away if you like that sort of thing! It tastes just as good either way.

Seafood Gratin
Adapted from Ina Garten’s recipe

1 cup chicken stock (seafood stock or clam juice)
1 cup heavy cream
½ cup plus 3 Tablespoons of good white wine (I used a Pinot Grigio)
1 ½ Tablespoons tomato paste mixed with 1 ½ Tbs of water
1 bag of medium size peeled and deveined shrimp
6 oz canned crab meat plus juice
7 Tablespoons of unsalted butter, divided
1 Tablespoon all-purpose flour
3 cups julienned leeks, white and light green parts (2 large)
1 ½ cups julienned carrots
1 cup panko
1/3 cup Parmesan cheese
1 Tablespoon minced garlic
Dried parsley
Salt and Pepper

Preheat oven to 375 degrees.

1. For the sauce combine the stock, cream, ½ cup of wine, and the tomato mixture in a medium saucepan. Bring to a boil, lower the heat, add the shrimp. After 3 minutes, use a slotted spoon to remove the shrimp to a bowl. Add the juice from the crab meat to the sauce mixture and then add the crab meat to the shrimp.

2. Continue to cook the sauce until reduced by half, about 12 minutes. Mash 1 Tablespoon of the butter with the flour. Whisk the butter mixture into the sauce along with some salt and pepper, to taste. Simmer, stirring constantly, until thickened, about 5 minutes. Set aside.

3. Melt 3 Tablespoons of the butter in a medium sauté pan. Add the leeks and carrots and cook over medium heat for 10 minutes, until softened. Add the remaining 3 Tablespoons of wine, salt and pepper, and cook for 10 more minutes, until tender. Set aside.

4. Combine the panko, Parmesan cheese, parsley and garlic. Melt the remaining 3 Tablespoons of butter and mix it into the crumbs until they are moistened.

5. In a medium casserole dish, add the seafood mixture. Add the vegetable mixture on top of the seafood. Pour the sauce over the entire mixture. Spoon the crumb mix evenly on the top.

6. Bake for 20 minutes until the top is browned and the sauce is bubbly.

7. Gobble up immediately.

Here are my leeks and carrots cooking away


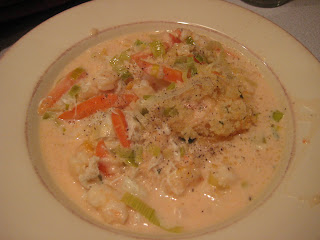
And the finished, delicious product!


Last bite: I will definitely make this again. Maybe someday I’ll even make it the right way with all the right ingredients. Or maybe not. Either way, I’ll be happy in my tummy!

Tuesday, January 19, 2010

Chicken Saltimbocca = So Good!


Yesterday I had the day off of work and so I decided to try a recipe I have been thinking about for awhile. On the menu was Potatoes Gratin, Orange and Honey glazed Carrots and Chicken Saltimbocca.

The potatoes are from a Tyler Florence episode and are now a staple in our home…as they are delightful! Rich and creamy with the thyme giving them a nice earthy flavor. The recipe calls for Idaho potatoes but I like to use Yukon Gold potatoes. I think they are delicate and creamy in nature..and I just love them!

Next up --the Orange and Honey Glazed Carrots. These came from Ina Garten's Barefoot Contessa At Home cookbook. I was pretty disappointed in these carrots. Either I totally screwed them up…or they just didn’t produce the flavor punch I was after. Hey, I love cooked carrots as much as the next person….but ohhh…I was hoping for that sweet and citrus fruit zing of flavor I felt I was promised. To me, they just tasted like, cooked carrots.

And finally, for the crème de la crème! The Chicken Saltimbocca. This recipe was a combination of two recipes. Part of a recipe from my Betty Crocker “Italian” cookbook (yes, it sounds like a cheater Italian cookbook, and it probably it…but it has some yummy recipes in there!) and part from Giada DeLaurentiis “Everyday Italian” cookbook.

These little chicken wonders practically melted in my mouth. I’m not often a huge fan of chicken…mostly because I tend to always mess it up and it comes out dry and chewy. But this was one of the best chicken dinners I have ever made! ...just ask my husband :)


Here is my photo of Chicken Saltimbocca...no...not as appealing as the stock photo up top. I guess that is what happens when you are starving and your mouth is watering because this chicken smells so yummy! I promise to get better at taking pictures, but you see, I am much more interested in eating!


Chicken Saltimbocca

adapted from Betty Crocker's Italian Cooking

4 chicken breasts
1/2 cup all purpose flour
4 slices prosciutto
4 thin slices mozzarella cheese
Dried sage
1/4 cup butter
1/2 cup dry white wine
Salt and Pepper to taste

1. Lightly pound each chicken breast with a meat mallet to tenderize and to flatten slightly. Dredge lightly in flour and shake off excess. Layer 1 slice of prosciutto and cheese and sprinkle sage leaves on top. Roll up chicken and either hold together with toothpicks or butcher string.

2. Melt butter in a skillet over medium heat. Cook chicken rolls in butter for about 5 minutes, turning occasionally, until brown. Add wine. Sprinkle with salt and pepper. Cover and cook over medium-high heat until chicken is cooked through.


Last Bite: Skip the carrots and go right for the chicken saltimbocca….and the potatoes are a pretty wonderful side too!

Dig in!

So I’ve started a blog. Not unlike pretty much everyone else in the world. But this blog is a food blog…my favorite kind of blog. I have spent enough hours of my life engrossed in one food blog after another that I finally figured I could probably give my own food blog a shot.

I like to cook. I love to eat.

And this will give me some sort of backing to the countless hours I spend thinking about food.
I have no idea where this will go, but in the wise words of Meg Ryan from the movie Joe Versus the Volcano…. “We’ll just jump, and we’ll see”